iCloud vs. iTunes backups: The crucial differences that affect your data
 Image: IDG
Once upon a time one of the primary handicaps of iOS devices was the fact that you had to physically connect it to a Windows or Mac PC with a USB sync cable to back it up using iTunes. With iOS 5 Apple introduced iCloud, essentially allowing users to cut the cord. But these iOS backup methods were not created equal, and if you don’t choose carefully you could be risking significant data loss. To ensure your iPhone or iPad data is fully protected, here’s a look at what each option backs up and when to use it.
iCloud Backup
 IDG
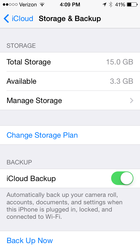
IDGiCloud Backup in iOS.
iCloud Backup lets you back up your data wirelessly and automatically to your iCloud account. To enable iCloud Backup, you can either select the option from the settings for your iOS device in iTunes when it is connected, or you can do it from the iOS device itself. Just go to Settings>iCloud, scroll down to the bottom and select Storage & Backup. It will show you how much total storage you have in iCloud, and how much is still available. At the bottom there is a toggle to turn iCloud Backup on or off. When activated, it will perform the backup automatically when your device is plugged in, locked, and connected to Wi-Fi. You can also manually initiate a backup anytime.
Apple provides 5GB of free cloud storage space, but you can purchase additional iCloud storage for a fee. The 5GB allocation is per Apple ID, so that space may be split if one person has both an iPhone and an iPad.
While this method is exceptionally convenient, it doesn’t perform a full backup. It backs up only what Apple deems the “most important data” on your iOS device: your camera roll, accounts, documents, and settings.
 IDG
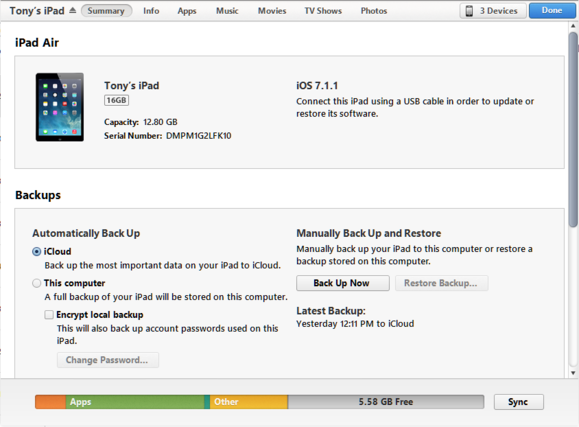
IDGYou can manually perform an iCloud Backup from your iOS device or from within iTunes on your computer.
Because of these limitations, iCloud backup is best used when you’re on the go, have minimal data to back up, or just can’t get to your Mac or PC.
iTunes Backup
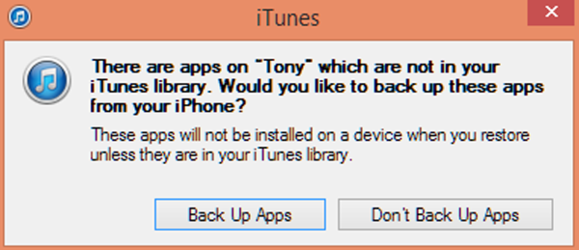
Apps are the most glaring omission from the list of data iCloud backs up. But that’s mostly for the sake of efficiency. Your purchased apps, music, movies, and books will be re-downloaded from the App, iTunes, and iBook stores when you restore from an iCloud Backup.
The same cannot be said about your music or videos that weren’t purchased through iTunes, photos that aren’t stored in the local camera roll, your call history, homescreen arrangement, and loads of other data. To make safety copies of those, you’ll have to use the good ol’ iTunes Backup.
 IDG
IDGIf you want to back up your apps, you have to do it through iTunes.
An iTunes Backup is also the best choice If you have a lot of large files or want networked backups.
To perform an iTunes backup, plug your iOS device into your Mac or PC, select it in iTunes, and check This Computer under Automatically Back Up.
Encrypting your backup
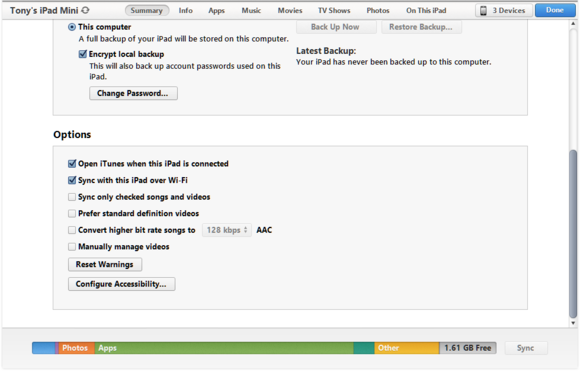
Under the iTunes Backup option in iTunes is an additional checkbox to “Encrypt local backup.” You might think this is unnecessary if you’re the sole user of your PC and it is safely in your home.
 IDG
IDGMake sure to encrypt your backup if you have sensitive work data on your iOS device.
But checking this box allows iTunes Backup to save all of your account passwords from your iOS device. Without this, you’ll be able to restore all of your apps, data, and settings, but you’ll have to re-enter all of your passwords—many of which you probably entered once months or years ago and promptly forgot.
Encryption is even more critical if you also use your device for work and keep sensitive company information on it. Encrypting the backup will protect it from unauthorized access and ensure that nobody else will be able to restore your apps and data to a different iOS device.
The best choice: use both together
There’s no denying the convenience of being able to back up and restore your iOS device without having to use iTunes or a PC, but it shouldn’t be your only method. For the best protection, use both backup options. Take advantage of iCloud Backup’s ease and reliability, while also performing a more comprehensive iTunes Backup at least once a month. You’ll have the peace of mind of knowing your iOS data will be there when you need it.